Safety Icon Design – Photoshop Graphic Design Tutorial 6
In Category:
Intermediate Photoshop Tutorials
I was thinking about how to add to the list of Photoshop icon designs that I am working on. Many of you have already read my “Creating a Calendar” icon. Anyways, a new family member has arrived, and it is the Safety Icon. Once you complete this Photoshop tutorial, you will have the following results:
Let’s begin with the first and foremost basic step, which is creating the environment or the background for our icon. I have overlayed and added some shadows to my background so that you can just save my background, and start working straight from it.

Our first step would be creating a custom shape, which will be the Diamond Card from your Custom Shape Tool’s selection. So grab that shape, set the background to white, and create an average size icon to the left-hand side of your background.


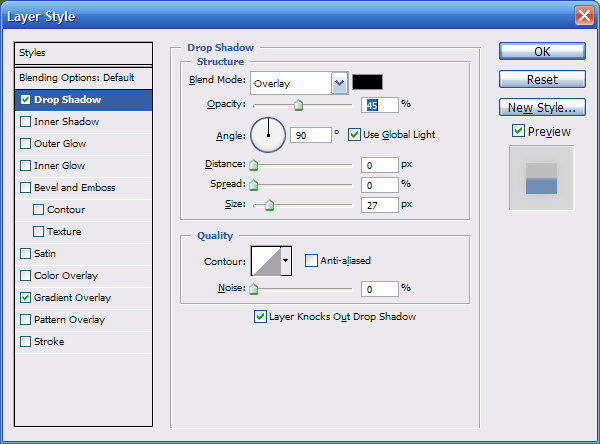
Now that we have our shape, let’s add some base to it so that it will look more bulky. I have put together a list of Layer Styles that you should apply, so go to Layer > Layer Style > … and begin!


Looking good. Our base is complete, so let’s begin to add details that will start the finish cut of our icon. Grab the same Diamond Card Shape, and create the same icon, except smaller and inside the base of our icon. Oh, and set the background to #ff6c00.

We are getting closer to home, so now that we have the finish cut of our icon, let’s put some more detail on it. Duplicate the shape that you have just created, and apply the following Layer Style:

Results

Duplicate the same shape again, and clear all layer styles. Now rasterize the shape, and grab your Burn Tool. Start touching the left-hand side of the orange diamond. Then grab the Eraser Tool to do some minor touch-up on the areas that stood out a little.
Results

Now let’s add some shine to it. Duplicate the original orange diamond again, clear off any layer styles, and grab your Dodge Tool. Set the size to 110. and touch up on the top side of the diamond. Grab your Eraser Tool, and finish touching up on the areas that stand out.
Results

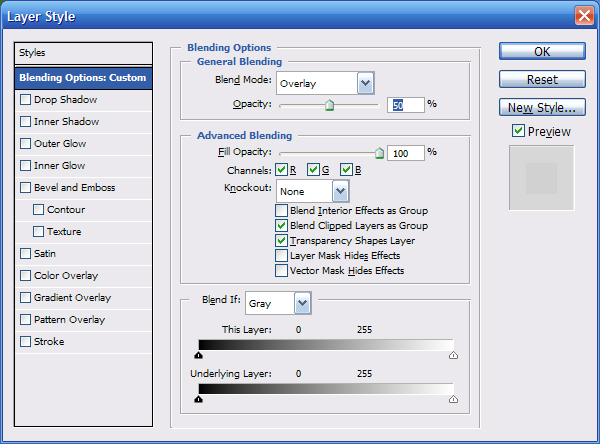
We are almost in shape. A few more details, and our icon is ready to be used. Duplicate the orange diamond again, set the background to white, and rasterize it. Then grab your Eliptical Marquee Tool, and cut off a nice chunk. You can follow my guides beneath. Once you have cut the shape, set the Blending Options to Overlay. Use your Eraser Tool to touch up on the areas that stand out.


Results

You can give yourself a nice pat on the back as we have just completed the most difficult part of the tutorial. Everything else should go with an ease, so let’s get to it. Go back to your Custom Shape Tool, and from the list, select School. Place the shape in the center of the orange diamond, and go to Edit – Transform – Flip Horizontal.
Results

Let’s add some detail to our newly-installed shape. Go to your Layer – Layer Style, and apply the following styles:

Results

You are now done. You can go ahead and duplicate the icons and resize them. After playing around a little, I got this:

This Photoshop Tutor tutorial has been tagged with: be careful, be safe, caution, drawing, drawing tutorial, exercise caution, Photoshop design tutorials, safe, safety, safety icon, safety image, safety is key, safety is number one, safety sign, safety signs, take care


